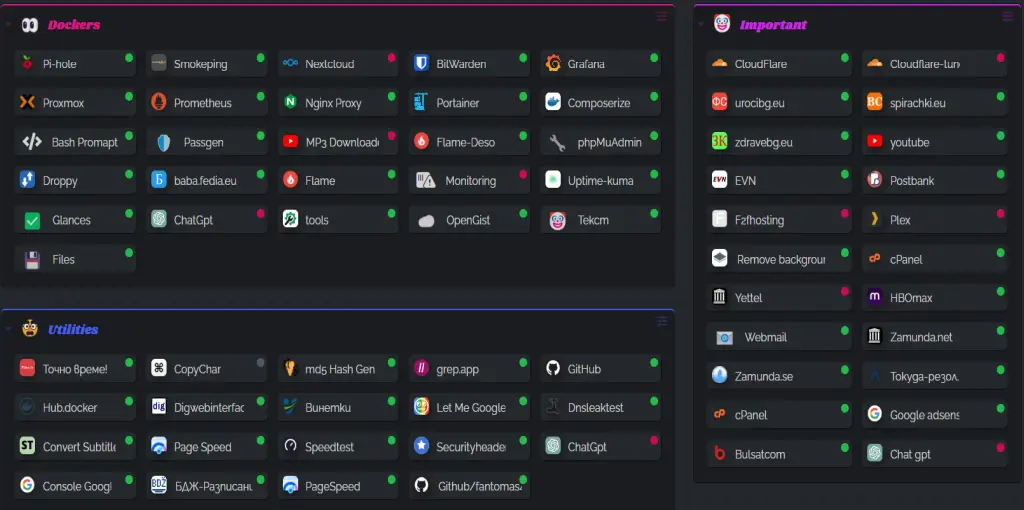
How to Install Dashy on Docker with Docker Compose

Dashy is a highly customizable dashboard application that allows users to organize and manage web resources, services, and applications in one place. It is built using modern web technologies and can be easily deployed on various platforms. One of the most popular ways to install Dashy is using Docker and Docker Compose. This article provides a step-by-step guide on how to install Dashy on Docker with Docker Compose, ensuring a smooth and straightforward setup process.
What is Docker and Docker Compose?
Before diving into the installation steps, it’s important to understand what Docker and Docker Compose are.
Docker is a platform that allows you to create, deploy, and manage lightweight, portable containers. These containers package an application and its dependencies, ensuring it runs consistently across different environments.
Docker Compose is a tool that helps you define and manage multi-container Docker applications. With Docker Compose, you can use a simple YAML file to define services, networks, and volumes, making it easier to manage complex applications.
Prerequisites
Before you begin, ensure you have the following prerequisites:
- A Linux-based server or local machine with at least 1GB of RAM.
- Docker and Docker Compose installed on your system.
- Basic knowledge of terminal commands and access to a user account with sudo privileges.
If Docker and Docker Compose are not installed, you can easily install them using this guide
1. Update System Repositories
First, update your system repositories and installed packages on your server or machine. This is done with the following commands:
sudo apt-get update
sudo apt-get upgrade
These commands ensure that all the software packages on your system are up to date.
2. Create a Directory to Store Docker Containers
For better organization of your Docker containers, it’s useful to store all containers in a specific directory. In your home directory, create a folder called dockers. If it doesn’t exist already, you can create it with the following command:
mkdir ~/dockers
3. Create a Directory for Dashy
Within the dockers folder, create a new directory where you will place the Dashy setup:
mkdir ~/dockers/dashy
4. Create Docker Compose and Configuration Files
Navigate to the dashy directory and create two files: docker-compose.yml and conf.yml. You can create and edit these files using a text editor like vi:
cd ~/dockers/dashy
vi docker-compose.yml
vi conf.yml
5. Add Content to the docker-compose.yml File
In the docker-compose.yml file, add the following content:
version: '3.3'
services:
    dashy:
        ports:
            - '9898:80'
        volumes:
            - '/root/dockeri/dashboard/conf.yml:/app/public/conf.yml'
        container_name: my-dashboard
        restart: always
        image: 'lissy93/dashy:latest'
networks:
  default:
    name: monitoring-net
    external: true
This configuration sets up the Dashy service with specific ports, a volume mapping for the configuration file, and a custom network.
After adding the content, save the file by pressing :wq in vi.
6. Add Content to the conf.yml File
In the conf.yml file, add the following sample content:
---
# Page meta info, like heading, footer text and nav links
pageInfo:
  title: Dashy
  description: Welcome to your new dashboard!
  navLinks:
  - title: GitHub
    path: https://github.com/Lissy93/dashy
  - title: Documentation
    path: https://dashy.to/docs

# Optional app settings and configuration
appConfig:
  theme: colorful

# Main content - An array of sections, each containing an array of items
sections:
- name: Getting Started
  icon: fas fa-rocket
  items:
  - title: Dashy Live
    description: Development and project management links for Dashy
    icon: https://i.ibb.co/qWWpD0v/astro-dab-128.png
    url: https://live.dashy.to/
    target: newtab
  - title: GitHub
    description: Source Code, Issues, and Pull Requests
    url: https://github.com/lissy93/dashy
    icon: favicon
  - title: Docs
    description: Configuring & Usage Documentation
    provider: Dashy.to
    icon: far fa-book
    url: https://dashy.to/docs
  - title: Showcase
    description: See how others are using Dashy
    url: https://github.com/Lissy93/dashy/blob/master/docs/showcase.md
    icon: far fa-grin-hearts
  - title: Config Guide
    description: See the full list of configuration options
    url: https://github.com/Lissy93/dashy/blob/master/docs/configuring.md
    icon: fas fa-wrench
  - title: Support
    description: Get help with Dashy, raise a bug, or get in contact
    url: https://github.com/Lissy93/dashy/blob/master/.github/SUPPORT.md
    icon: far fa-hands-helping
  - title: Urocibg
    description: Get help for Windows and Linux
    url: https://urocibg.eu/
    icon: far fa-hands-helping
This configuration provides a simple setup for your Dashy dashboard with some sample links and sections. You can customize this file according to your needs.
Save the file by pressing :wq in vi.
7. Start the Docker Compose File
Now, you are ready to start Dashy using Docker Compose. Run the following command in the terminal while in the dashy directory:
docker compose up -d
The -d flag runs the containers in detached mode, allowing them to run in the background.
8. Verify Dashy is Running
After the command completes, you can check if the Dashy container is running with:
docker ps
This command lists all running Docker containers. You should see your Dashy container named my-dashboard running.
9. Access Dashy Dashboard
You can now access Dashy through your web browser. Open your browser and navigate to:
http://SERVER_IP:9898
Replace SERVER_IP with your server’s IP address or domain name. This should open the Dashy dashboard with the configuration you set up.
10. Explore More Configuration Options
If you want to explore more example configuration files for Dashy or further customize your dashboard, you can find a list of examples and documentation here.
Conclusion
By following these steps, you’ve successfully installed and configured Dashy using Docker and Docker Compose. This setup allows you to have a customizable dashboard for organizing and accessing your web resources efficiently. With Docker Compose, managing and updating Dashy becomes a straightforward process, giving you control and flexibility over your dashboard environment.
Thank you for reading the article! If you found the information useful, you can donate using the buttons below:
Donate ☕️ with PayPalDonate 💳 with Revolut


